Linking oneAPI libraries to a Visual Studio Code C++ project
16 August 2023
In the previous guides in this series, I setup the Visual Studio Code (VSCode) development environment on a Ubuntu 20.04 platform from scratch. The previous guides in this series are:
- Guide 1(Part 1)- Debugging SYCL™ code with DPC++ and Visual Studio® Code
- Guide 1(Part 2)- Setting up Visual Studio Code on Ubuntu for C++ development
- Guide 1(Part 3)- Setting up SYCL™ development with oneAPI™, DPC++ and Visual Studio® Code on Ubuntu
- Guide 2- Debugging the DPC++ debugger using Visual Studio® Code on Ubuntu
- Guide 3- Porting C++ projects to SYCL with DPC++ and Visual Studio Code
- Guide 4- Linking oneAPI libraries to a Visual Studio Code C++ Project
Introduction
The development and tuning of applications for vendor neutral acceleration hardware has been made easier with the open-source Data Parallel C++ (DPC++) SYCL compiler and the support of the accompanying oneAPI ecosystem. As well as providing the tuning tools, the ecosystem also provides a core set of Runtime Libraries to assist in the development of high-performance, data-centric applications. This guide, continues from Guide 3 and will show you how to link the oneAPI Math Kernel Library (oneMKL) to a simple DPC++ program using the VSCode IDE. The Microsoft C/C++ extensions pack will be used to configure the build and debug sessions for this DPC++ program.
Prerequisites
This guide relies on the VSCode development environment being already setup and can compile existing DPC++ projects. If VSCode is not setup for DPC++ development already, then Guide 1 parts 2 and 3 will show you the steps to do this. It is also recommended Guide 3 is looked at prior to this guide as it goes into detail on tools mentioned in this guide.
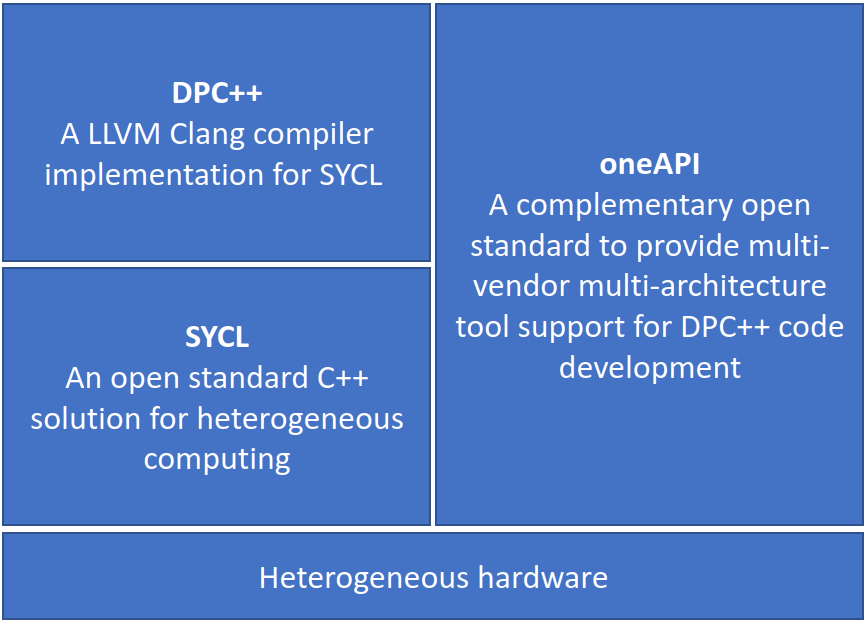
Figure 1: The oneAPI ecosystem.
We will use the Intel oneAPI example program student_t_test with the oneMKL library. This guide converts the example into a VSCode Microsoft C/C++ extension specific project. The example program is available from numerous sources, but we will use Intel’s VSCode extension Code Sample Browser for Intel® oneAPI Toolkits to retrieve it.
Porting the example project to use Microsoft C/C++ extensions’ build and debug configurations provides a feature rich interactive development GUI, and can be carried out in a matter of minutes* (see Guide 3: Porting C+++ projects on how to do this). All the Intel example projects, whether they use the CMake, Makefile or GNUmakefile build systems, can already be used within the framework on the VSCode IDE. However, those build systems only allow the VSCode IDE to be used as a code editor, using its built in terminal to execute make commands. While some developers are very proficient at using a shell-based environment, there are others who are more familiar with GUI IDEs like Microsoft’s Visual Studio. The Microsoft C/C++ extensions along with other third-party extensions provide a similar experience.
Linking oneAPI libraries
Like with other build configuration tools, the Microsoft C/C++ extensions for VSCode needs to hold the paths to any external static libraries and header files that are to be included as part of the program’s compilation.
The DPC++ compiler uses the following option flags to specify where it can locate and use specific static libraries.
Compiler option flags:
- -l links with a library file.
- -L looks in directory for library files.
Using the oneAPI example program t_test.cpp from the example, we will now create an equivalent project using the Microsoft C/C++ extension. The steps are:
- Download the oneAPI example program.
- Create a new project folder and copy across the code files from the oneAPI example.
- With reference to Guide 3, create a new project to duplicate the example.
- Edit the configuration files to fit the new project structure and the program’s name (matching the name of the .cpp file).
- With reference to Guide 3, use the Bear tool to create a Compilation Database file.
- Examine the Compilation Database information and the make file in the original MKL example project.
-
Editing the new project’s task.json file and referencing figure 3, insert the necessary compiler paths to the libraries to be linked to the project.
{ "version": "2.0.0", "tasks": [ { "type": "cppbuild", "label": "t_test MKL Debug C/C++: Intel icpx build active file", "command": "/opt/intel/oneapi/compiler/latest/linux/bin/icpx", "args": [ "-fsycl", "-fno-limit-debug-info", "-DMKL_ILP64", "-fdiagnostics-color=always", "-fsycl-device-code-split=per_kernel", "-g", "-I/opt/intel/oneapi/mkl/latest/include", "-L/opt/intel/oneapi/mkl/latest/lib/intel64", "-lmkl_sycl", "-lmkl_intel_ilp64", "-lmkl_sequential", "-lmkl_core", "-O0", "${workspaceFolder}/src/${config:programName}.cpp", "-o", "${workspaceFolder}/bin/${config:programName}_d" ], "options": { "cwd": "${workspaceFolder}" }, "problemMatcher": [ "$gcc" ], "group": "build", "detail": "compiler: /opt/intel/oneapi/compiler/latest/linux/bin/icpx" }, { "type": "cppbuild", "label": "t_test MKL Release C/C++: Intel icpx build active file", "command": "/opt/intel/oneapi/compiler/latest/linux/bin/icpx", "args": [ "-fsycl", "-DNDEBUG", "-DMKL_ILP64", "-I/opt/intel/oneapi/mkl/latest/include", "-L/opt/intel/oneapi/mkl/latest/lib/intel64", "-lmkl_sycl", "-lmkl_intel_ilp64", "-lmkl_sequential", "-lmkl_core", "${workspaceFolder}/src/${config:programName}.cpp", "-o", "${workspaceFolder}/bin/${config:programName}" ], "options": { "cwd": "${workspaceFolder}" }, "problemMatcher": [ "$gcc" ], "group": "build", "detail": "compiler: /opt/intel/oneapi/compiler/latest/linux/bin/icpx" } ] } Figure 3: The project's tasks.json build configuration file. - Compile the program by using keyboard shortcut ctrl+shift+b.
- Execute the program to debug it by using keyboard shortcut ctrl+shift+d, followed by F5.
- Choose the kernel acceleration device from the VSCode drop menu.
Conclusion
With this knowledge presented here along with the supporting Guides 1 and 2, you are able to convert and use DPC++ examples in the VSCode IDE with all the advantages it has to offer.
Next steps
Many target devices to accelerate DPC++ programs are available on remote or cloud platforms. The next guide in the series, Guide 5, will show you how to use VSCode to connect to remote platforms and their devices using SSH, in particular Intel’s DevCloud platform. It will show you how to take existing VSCode DPC++ example projects and copy to the DevCloud, select a target node and use it to compile and debug using VSCode.

Illya Rudkin
Principal Software Engineer
In This Series
This article is part of a series, please use links below to jump to different parts.
-
Guide 1Part 1Debugging SYCL™ code with DPC++ and Visual Studio® Code
-
Guide 1Part 2Setting up Visual Studio Code on Ubuntu for C++ development
-
Guide 1Part 3Setting up SYCL™ development with oneAPI™, DPC++ and Visual Studio® Code on Ubuntu
-
Guide 2Debugging the DPC++ debugger using Visual Studio® Code on Ubuntu
-
Guide 3Porting C++ projects to SYCL with DPC++ and Visual Studio Code
-
Guide 4Linking oneAPI libraries to a Visual Studio Code C++ Project