Setting up C++ development with Visual Studio® Code on Ubuntu
01 March 2023
The other guides in this series are:
- Guide 1(Part 1)- Debugging SYCL™ code with DPC++ and Visual Studio® Code
- Guide 1(Part 2)- Setting up Visual Studio Code on Ubuntu for C++ development
This guide describes how to set up your Ubuntu machine so that you can write C++ code, using Visual Studio Code, then compile and debug it. A third guide follows on from this one and explains how to prepare Visual Studio Code for DPC++ development. This guide assumes you are not yet familiar with using Visual Studio Code IDE.
First to install the Visual Studio Code application. If you haven’t already done so, I recommend this guide on how to do that.
When Visual Studio Code is first installed it is effectively an empty IDE shell. It must be told what it can do and how it will do it, to fit your development needs. For C/C++ development, table 1 lists the Visual Studio Code extensions that can be used in the context of SYCL development. Use the Visual Studio Code extensions explorer panel, search for and install the following extensions. The recommended extensions listed are optional. They can assist in navigating a project if you are porting a project from another build configuration or wish to use multiple build configurations.
| Visual Studio Code extension | Microsoft C/C++ requirement | Notes |
|---|---|---|
| Microsoft C/C++ extension pack | Yes | |
| CMake | Recommended | Some Intel DPC++ code examples use CMake project configurations. CMake is not used for this article. |
| Makefile tools | Recommended | Some Intel DPC++ code examples use Makefile project configurations. Makefile is not used for this article. |
| C/C++ Runner | Recommended | Automates build configurations for Debug and Release builds. Not used for this article. |
| .md document reader | Recommended | Most code examples have Readme and other documentation in the .md format. Type in Visual Studio Code ctrl-shift-v to render a .md document. |
Table 1: Visual Studio Code C/C++ helper extensions
These are some other recommended packages that can be installed, however they are not directly used by this article:
-
Install Git: https://git-scm.com/book/en/v2/Getting-Started-Installing-Git.
-
Install CMake: Using a terminal window type
sudo apt updatefollowed bysudo apt -y install cmake pkg-config build-essential.
Prepare Visual Studio Code for C/C++ compilation
If you already have a standard C/C++ development environment set up and working using Visual Studio Code, you can go straight to the Building and Debugging Helloworld section.
With the necessary Visual Studio Code extensions installed for C/C++ development, the Microsoft C/C++ extensions need to be configured for each C or C++ project. The Microsoft C/C++ extension creates a .vscode directory in the project’s top folder directory. It populates the directory with the following essential files. These are project configuration files, each of which is explained in table 2. Configuration files hold the information on how to compile and debug a program.
Table 2 lists the .json configuration created and used by Microsoft C/C++ extensions.
| Configuration file | Location | Description | Dependency |
|---|---|---|---|
| tasks.json | Workspace Folder/.vscode | Holds one or more build configurations. Each holds build instructions for a type of executable to be built. A specific compiler can be specified for each. | Essential |
| launch.json | Workspace Folder/.vscode | Holds one or more debug configurations, each holds settings on how a specific executable will be debugged. | Essential |
| c_cpp_properties.json | Workspace Folder/.vscode | Holds the compiler(s) path(s) and C/C++ IntelliSense settings. | Essential |
| settings.json | Workspace Folder/.vscode | Holds configuration files parameter variables which can hold text values that can be substituted in some (not all) Visual Studio Code options to allow text substitution. An alternative to option $env variables which should work but do not work. | Depends on the needs of the project and its structure |
Table 2: The Microsoft C/C++ extension configuration and settings files for a project
The Helloworld program shown in figures 1a and 1b will be used to take us through the steps to set up a normal C++ project using the default gcc compiler and debugger. The configuration files in table 2 will be edited to allow us to build a debug and release executables and then choose the executable from the Visual Studio Code’s Command Palette. Using an editor of your choice, create the programs files for the Helloworld program.
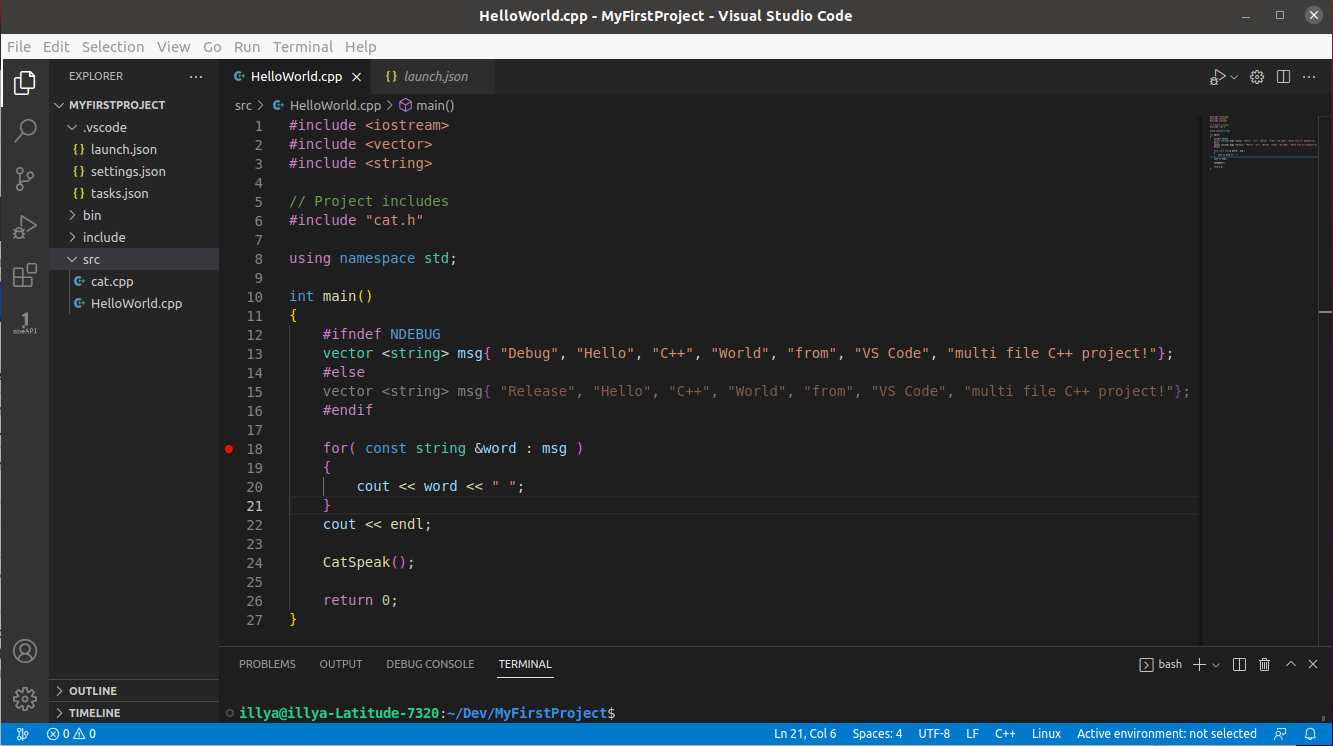
Figure 1a: Helloworld code project
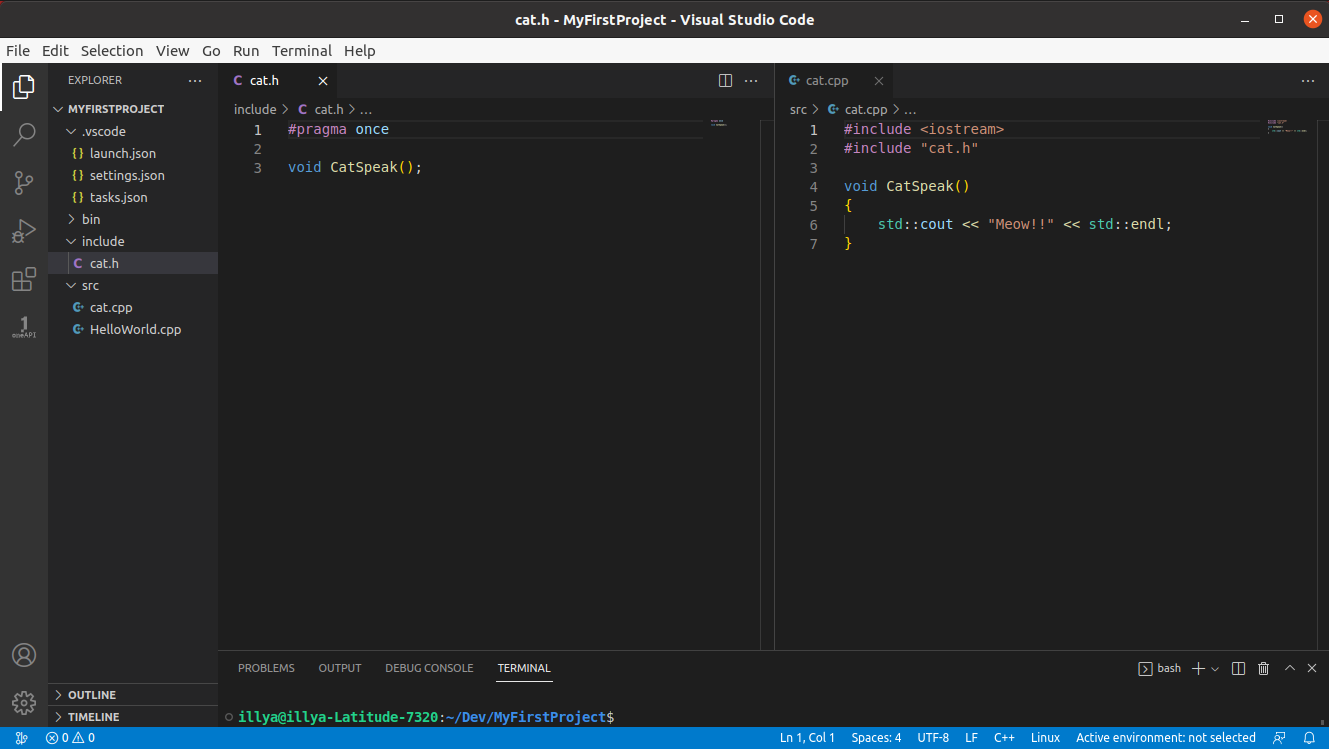
Figure 1b: Helloworld code project
Setup the project’s structure
The workspace’s folder (figure 2) contains what could be a typical file structure of a more complicated project with many types of files. Create this file structure in a location of your choosing and place the Helloworld code files in their appropriate directories. For this example, the project’s name is MyFirstProject (the Folder). Now we will create the Visual Studio Code C/C++ project Helloworld associated with the folder MyFirstProject.
Open a terminal window and change the path to be inside the project’s top folder MyFirstProject. At the terminal command
line type code .. This will open the application Visual Studio Code if not open already or create a new application
window as shown in figures 1a and 1b.
When you want to open a project again in the future, Visual Studio Code will ask you to choose a top workspace folder like this. Notice in Figure 1a how the Visual Studio Code Explorer pane reflects the same folder structure with the addition of the hidden .vscode directory. The C/C++ extension creates the .vscode directory automatically for you. Most of the behavior attributes associated with a particular project are held in files stored in this directory.
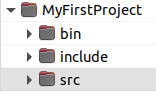
Figure 2: Project folder structure
The project’s build and debug configuration settings need to accommodate this file structure in order to find files and output files in their correct destination folders.
Setup the project’s multiple build configurations
The first task to do when setting up a C++ project is to configure the types of build that is needed. For this project there will be a debug and release executables located in the bin directory. To differentiate the two executables, the debug executable filename will have _d appended to it. You of course can choose to call it what you want. We will create and customize a task.json file generated by the C/C++ extension to do this.
From the Visual Studio Code’s main menu choose Terminal → Configure Default Build Task…. From the drop list choose a gcc compiler. Remember, all the gcc compilers listed are aliases for just the one compiler. A new tasks.json file will be created with a task in it. The task will be labelled with the name of the compiler chosen from the drop list. This task contains the necessary gcc parameters to enable a selected .cpp file (in the Explorer pane) to be built into an executable containing debug metadata, aka a debug executable.
However, now that we have a custom project file structure with more than one code file in it, and we want separate debug and release builds, we need to edit the tasks.json to work with our requirements. Figures 4a and 4b show the build configuration tasks that will be used for this project. For reference, figure 3 shows the default build configuration created by the Microsoft C/C++ extension.
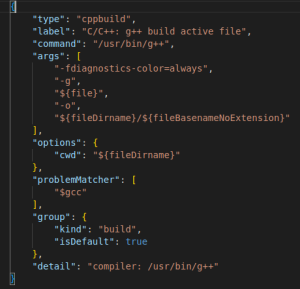
Figure 3: The default build configuration created by the Microsoft C/C++ extension
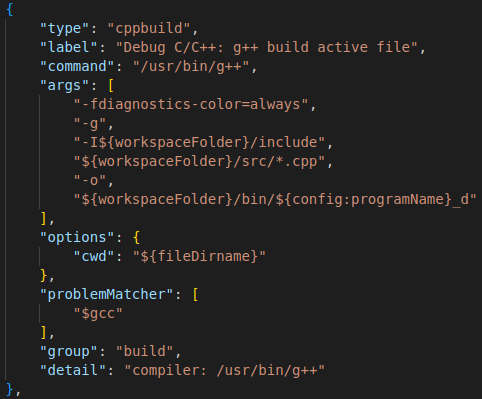
Figure 4a: Custom configuration task to build a Helloworld debug executable
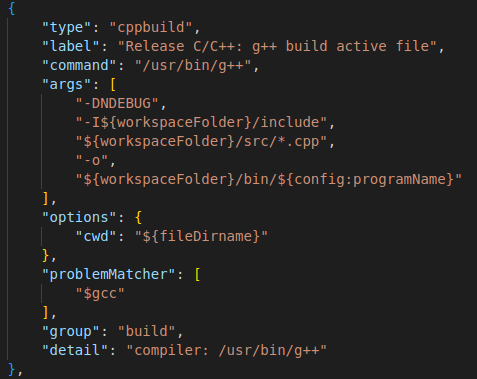
Figure 4b: Custom configuration task to build a Helloworld release executable
To customize the build configuration to suit this project’s requirements, carry out the following steps:
- Edit the default debug configuration to become that shown in figure 4a.
- Duplicate the debug build task and insert it below the first debug task in figure 4a. This will become the release build task.
- Edit the duplicate to become the release build task shown in figure 4b.
Some notable changes from the default build configuration are:
- The options label have been changed to reflect the type of build for the task.
-
The inclusion of the gcc compiler instruction
-I${workspaceFolder}/include. - The build is now not determined by the currently selected file in the Explorer pane. This can be any file and so the build could fail.
- Informs the compiler of additional directories to search in.
-
Replacing
${fileDirname}/${fileBasenameNoExtension}with${workspaceFolder}/bin/${config:programName}_d. - The build outputs are directed to be put in the folder bin.
- The name of the executable is now set by the parameter
${config:programName}. This will be explained in a moment. - The directive “isDefault”: true has been removed.
By removing the option isDefault from the task we are telling Visual Studio Code to let the user choose a build configuration manually for each and every build invocation.
With the debug and release build tasks now configured, a compilation of the code can take place. Later when typing ctrl+shift+b or choosing from the main menu Terminal→ Run Build Task…, Visual Studio Code will pop up a drop list menu of the types of builds available to us as shown in figure 5.
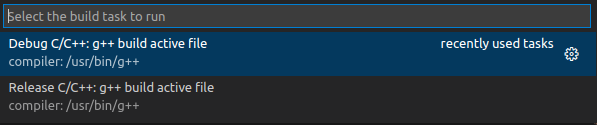
Figure 5: List of available build executable configurations
These are the names of the build tasks set by the task’s label option.
The only other differences between the release and debug build tasks for this project are:
- The compiler has been directed to define the compile symbol NDEBUG.
- The filename suffix _d has been removed.
As of writing this guide, the desired use of the task option env as shown in figure 6 was found to not work as expected. An alternative method of sharing parameters values among has been used.
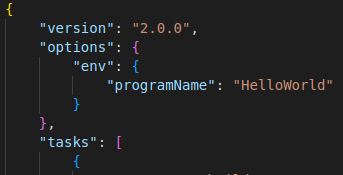
Figure 6: Global environmental variables in tasks.json file
The alternative approach to provide global environmental variables is to use Visual Studio Code’s program preference settings. Create a settings.json file in the .vscode directory and edit as shown in figure 7.

Figure 7: Visual Studio Code preference settings file
To use the environmental variable in any of the tasks in a tasks.json file insert it, i.e. ${config:programName}, into value of the option.
With the project’s build configurations now defined, compiling the program can take place. Type ctrl+shift+b and choose the type of program to build. Use the Visual Studio Code’s built-in terminal window or an external terminal window to locate the executable(s) in the bin directory.
Setup the project’s debug executable configuration
A launch.json file can contain multiple debug session configurations. For this project there will be only one launch configuration. The steps required to create a debug configuration for this project are:
- In the Explorer pane select the main .cpp file. For this project the file HelloWorld.cpp is selected.
- Open up the Visual Studio Code command palette by selecting from the main menu View→ Command Palette.
- In the edit box type the command c/c++: Add debug configuration.
- Select the command Add debug configuration, then choose from the drop down list the same compiler as used to build the program.
- Select the new launch.json file that has appeared in the Explorer pane and edit it to look like the debug configuration shown in figure 8.
- Save the file.
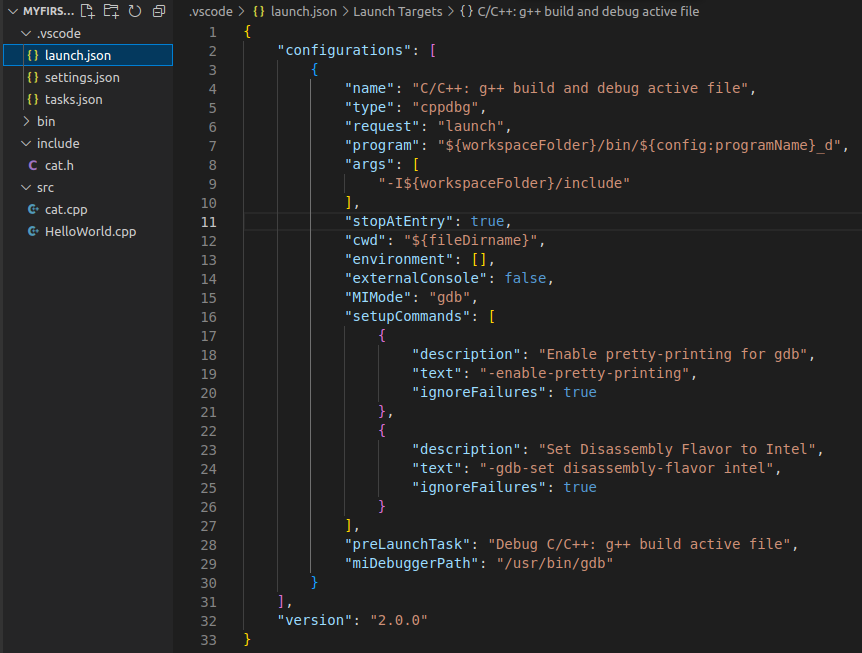
Figure 8: Customized debug launch configuration
Notable changes made to the configuration task file are:
- The environmental variable’s value substitution in the option program ensures the same name is used to identify the executable.
- The option stopAtEntry’ is set to true.
- The option preLaunchTask is changed to match the label of the debug build task in tasks.json.on
- The option “isDefault”: true has been removed to enable the different types of debug sessions to be called at any time.
To execute a debug session hit the functon key F5. In this case the debug build task will execute and re-build the executable (even if it has not changed), next the GUI will change to the debug mode, the Helloworld program code will be shown with the debugger halted at the main() scope of the program. See figure 9.
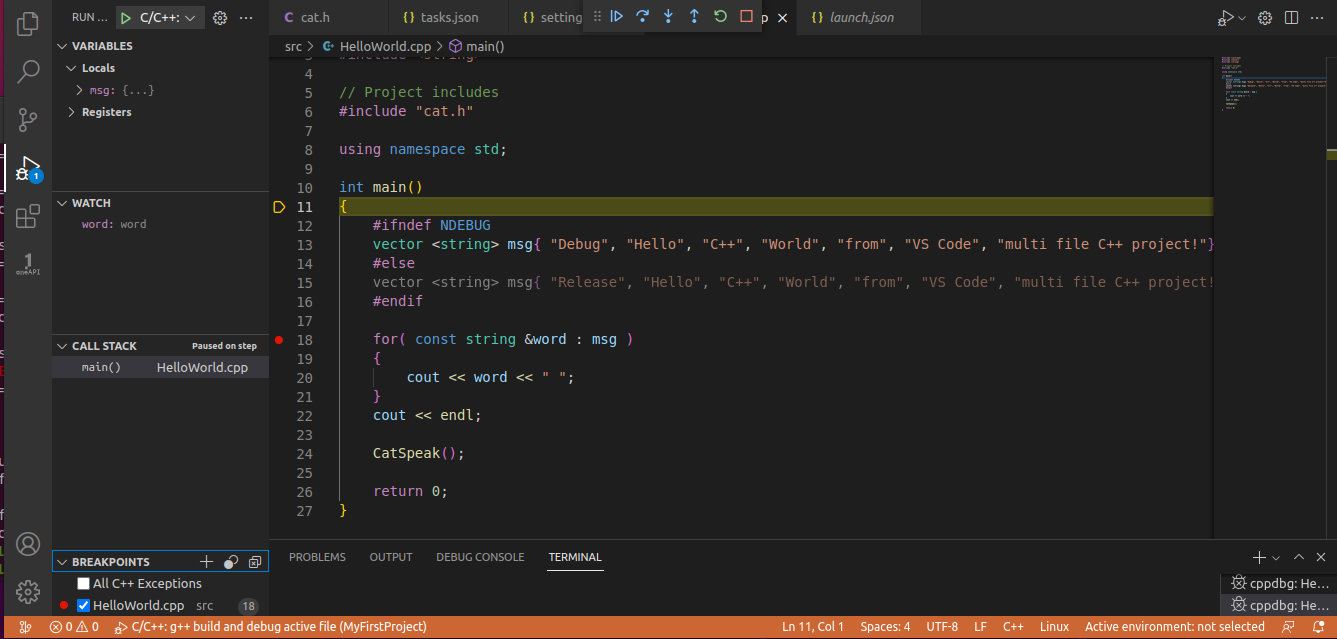
Figure 9: Helloworld program being debugged
The Helloworld program can be stepped through using the debug panel or the keyboard shortcuts along with setting or disabling of any breakpoints along the way.
Closing this project (close Folder) and re-opening the project should return you the same debug session with all the watch variables and breakpoints set from the previous session.
Now we have a working build and debug project we have established that we have a stable and reliable Visual Studio Code C++ development environment on the platform for normal C++ programs. We can proceed now to install the Intel oneAPI SDK and its dependencies to the C++ development environment. Once the oneAPI SDK toolkits have been installed and the OS configured appropriately for user access to low level systems, we can return to this project and verify it builds and debugs as expected, that we can build still normal C++ programs.
Setting up SYCL development with oneAPI and DPC++
Once you have a working C++ development environment it’s time to set up SYCL with oneAPI and DPC++.
Guide 1 part 3: Setting up SYCL development with oneAPI DPC++ and Visual Studio Code on Ubuntu

Illya Rudkin
Principal Software Engineer
In This Series
This article is part of a series, please use links below to jump to different parts.
-
Guide 1Part 1Debugging SYCL™ code with DPC++ and Visual Studio® Code
-
Guide 1Part 2Setting up Visual Studio Code on Ubuntu for C++ development
-
Guide 1Part 3Setting up SYCL™ development with oneAPI™, DPC++ and Visual Studio® Code on Ubuntu
-
Guide 2Debugging the DPC++ debugger using Visual Studio® Code on Ubuntu
-
Guide 3Porting C++ projects to SYCL with DPC++ and Visual Studio Code
-
Guide 4Linking oneAPI libraries to a Visual Studio Code C++ Project