SYCL-ing the 'smallpt' Raytracer
16 June 2015
1 Introduction
This blog post is first in the series of “how-to” articles on developing and porting applications using SYCL for OpenCL, the Khronos standard for C++ single-source heterogeneous programming, built on OpenCL.
Basic knowledge of C++ and some knowledge of working with compute APIs (like OpenCL or CUDA) is required. But do not fear if you are new to SYCL – there are great tutorials like Hello World From SYCL, Introduction To SYCL and the series of SYCL Tutorials which will bring you up to speed.
In this article we would like to present a “step-by-step” process of porting Kevin Beason’s smallpt – a global illumination renderer – to the SYCL platform.
2 Overview
First of all, what is smallpt?
Smallpt is an offline raytracer in 99 lines of C++ code featuring global illumination, soft shadows, antialiasing and more (for a full list of features, visit the website). The code is very neat but requires a lot of computational power, which makes it a great target for GPU acceleration.

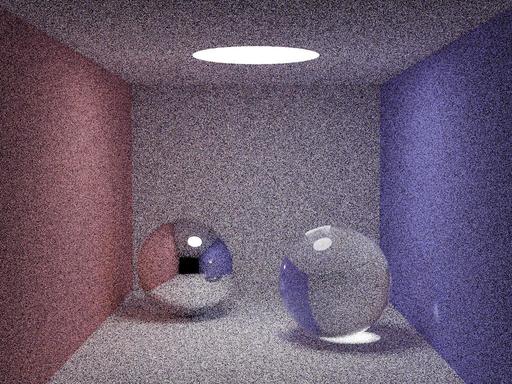
124 mins ( 5000 samples per pixel ) on 2.4 GHz Intel Core 2 Quad CPU using 4 threads – resolution 1024×768
The development machine is an Alienware 15 laptop with:
- 4th Generation Intel® Core™ i7 Processor
- AMD Radeon™ HD R9 295X with 4GB GDDR5 graphics memory
- Ubuntu 15.04
We are using GCC 4.9.2 because the version of Clang that is available via apt-get doesn't support OpenMP, which is used in the original code.
 ~/proj/sycl_smallpt$ g++ --version
g++ (Ubuntu 4.9.2-10ubuntu13) 4.9.2
Now, let’s copy the source code and compile using exactly the same compilation flags:
~/proj/smallpt$ g++ -O3 -fopenmp main.cpp -o smallpt
At this point we have one smallpt binary executable. Let’s run 5k samples per pixel:
~/proj/smallpt$ time ./smallpt 5000
A big cup of coffee later, we have the reference image.
Rendering (5000 spp) 100.00% // spp – samples per pixel
real 32m14.771s
user 252m7.268s
That is way too slow to allow an iterative development process, running the code to test each set of changes. Therefore, the number of samples per pixel will be reduced to 40 which should be a fair balance between picture quality and the time taken to render it.
~/proj/smallpt$ time ./smallpt 40
Rendering (40 spp) 100.00%
real 0m14.089s
user 1m48.080s

14 seconds ( 40 samples per pixel ) on 4th Generation Intel® Core™ i7 Processor CPU using 8 threads – resolution 1024×768.
Since we have a reference version we are ready to begin the porting process.
3 Porting
We have decided to split this part into several subcategories so that you can easily see the outline of the whole porting process.
3.1 Double to Float
A lot of GPUs still don’t support double-precision floating-point numbers. The final version of the application targets portability across a wider range of GPUs along with smaller data sizes, therefore we will use floats over doubles. For that reason, we will replace all instances of double with float.
| TYPE | REFERENCE | DOUBLE->FLOAT |
|---|---|---|
| Real time | 0m14.089s | 0m15.308s |
| User time | 1m48.080s | 1m58.572s |
Rendering 40 samples per pixel
"But, wait! The single-precision floating-point version is slower!", you might say – and the answer is "Yes, it is." – but there is a reason.
The roulette escape condition (which determines how many times the ray bounces through the scene) is often too small to be represented by single-precision floats, which results in additional cycles, artifacts and additional calculation for bounces.

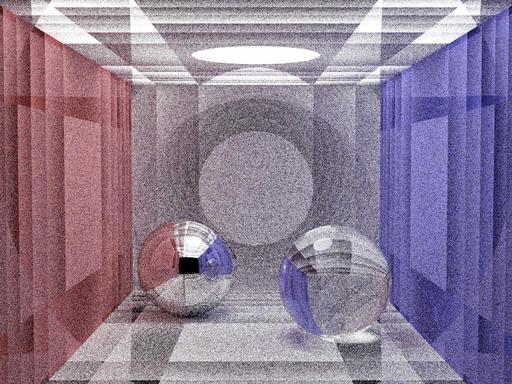
15.3 seconds ( 40 samples per pixel ) on 4th Generation Intel® Core™ i7 Processor CPU using 8 threads – resolution 1024×768. Using floats, featuring artifacts.
The plane’s artifacts are caused by the precision drop between doubles and floats. In order to fix that, we need to reduce the size of the spheres and reduce the sample rate.
float t, eps = 1e-4, b = op.dot(r.d), det = b * b - op.dot(op) + rad * rad;
becomes:
float t, eps = 1e-2, b = op.dot(r.d), det = b * b - op.dot(op) + rad * rad;
and
Sphere(1e5, Vec(1e5 + 1, 40.8, 81.6), Vec(), Vec(.75, .25, .25), DIFF), // Left
becomes:
Sphere(1e4, Vec(1e4 + 1, 40.8, 81.6), Vec(), Vec(.75, .25, .25), DIFF), // Left
After rebuilding and running:
| TYPE | REFERENCE | DOUBLE->FLOAT | FLOAT, REDUCED PRECISION |
|---|---|---|---|
| Real time | 0m14.089s | 0m15.308s | 0m11.603s |
| User time | 1m48.080s | 1m58.572s | 1m29.808s |
Rendering 40 samples per pixel

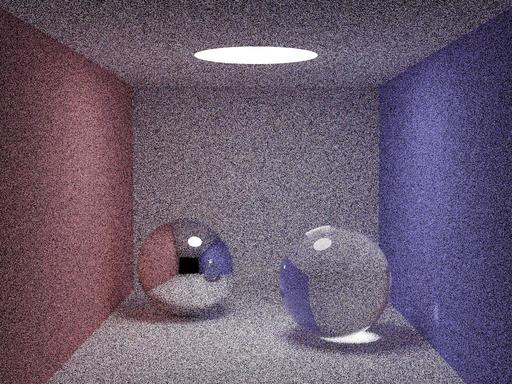
11.6 seconds ( 40 samples per pixel ) on 4th Generation Intel® Core™ i7 Processor CPU using 8 threads – resolution 1024×768. Using floats, reduced precision.
Now it looks much better; there are no artifacts and it’s faster! The next step is to replace the odd-looking erand48 with a more GPU-friendly PRNG class.
3.2 Random Number Generator
Since erand48() returns double-precision pseudo-random numbers in [0.0, 1.0), we need to replace it. As mentioned in the last section, we want to remove all instances of double.
Let’s replace it with our own simple version of an Xorshift PRNG.
class RNG {
public:
  unsigned int x;
  const int fmask = (1 << 23) – 1;
  RNG(const unsigned int seed) { x = seed; }
  int next() {
    x ^= x >> 6;
    x ^= x << 17;
    x ^= x >> 9;
    return int(x);
  }
  float operator()(void) {
    union {
      float f;
      int i;
    } u;
    u.i = (next() & fmask) | 0x3f800000;
    return u.f - 1.f;
  }
};
Its internal state is stored in an unsigned integer and initialized based on the seed parameter. The function call operator uses a union between float and integer. Then we do bit-shifting to get a pseudo-random integer value which later on is transformed to a float in the range [0.0, 1.0] . For more in-depth information see the Xorshift RNGs paper by George Marsaglia.
All instances of erand48(Xi) are replaced by rng() ( function operator of RNG class ), and the Xi values passed down the function calls are replaced with a reference to an instance of the RNG class.
Seed initialisation:
for (unsigned short x = 0, Xi[3] = {0, 0, static_cast( y * y * y )}; x < w; x++)
{
is replaced with:
for (unsigned short x = 0; x < w; x++) // Loop cols
{
  RNG rng(rand()); // initialize our own rng with rand() seed
At this time we choose a random seed, but it could be the row number. Later it will be the thread ID.
| TYPE | REFERENCE | DOUBLE->FLOAT | FLOAT, REDUCED PRECISION | RNG |
|---|---|---|---|---|
| Real time | 0m14.089s | 0m15.308s | 0m11.603s | 0m10.609s |
| User time | 1m48.080s | 1m58.572s | 1m29.808s | 1m21.532s |
Rendering 40 samples per pixel
Next, we need to remove recursion from the algorithm, as recursion is not allowed in GPU programming.
3.3 Recursion
As we can see, the raytracer uses recursion to compute the colour of any given pixel, but that is not supported in OpenCL. One way of dealing with that is to use templates to emulate it at compile time. When the template depth is large, corresponding to a larger number of bounces, this technique can increase the code size greatly. That said, as a proof of concept, recursion is possible. For this article, we are going to use an altered version of the algorithm that uses loops with no branching.
At this stage we are ready to start adding SYCL code.
3.4 SYCL-ing
If you've read our previous SYCL articles, you will know that SYCL is a single-source programming model. That means that the same code needs to be run through both a device and host compiler. In this process, we will be using Codeplay’s ComputeCpp as the device compiler. This will produce SPIR bytecode, which later on will be included and compiled with your favorite host compiler to produce a final binary. Here is a simple script that will do that for us:
#!/bin/bash
SYCLPATH="/home/codeplay/proj/ComputeCpp-15.05-Linux/"
$SYCLPATH/bin/compute++ -I $SYCLPATH/include --std=c++11 -O2 -Wno-ignored-attributes -sycl -intelspirmetadata -emit-llvm -D__DEVICE_SPIR32__  -o main.bc -c main.cpp
g++ -I$SYCLPATH/include -O3 -fopenmp --std=c++11 -include main.sycl main.cpp -c
g++ main.o $SYCLPATH/lib/libSYCL.so -O3 -fopenmp -lstdc++ -lOpenCL -o smallpt
Now to the fun part!
Create a queue from a device selector:
default_selector s_;
queue q_(s_);
Then, we introduce a new scope and create a buffer of a Vec array, to use RAII to write data back to its underlying container at buffer object destruction.
Vec * c = new Vec[w*h]; // effectively frame buffer.

buffer<Vec, 1> color_buffer(c, range(w *h)); // create buffer for colours
buffer<Sphere, 1>  spheres_buffer(spheres_glob[0], range(9));
After this is done, we need to create a command group, which will contain the ray kernel class. The ray kernel class is a functor that will contain the accessors to created buffers and information required to create a frame (width, height and number of samples). An alternative way of writing this would be using C++11 lambdas – see Hello World from SYCL for more details.
The last steps are creating the nd_range, calling the parallel_for method of the command group handler, and submitting the command_group to our queue.
buffer<Sphere, 1>  spheres_buffer(&spheres_glob[0], range(9));
auto cg = [&](handler &ch) {
      kernel_r ray_ = {
          color_buffer.get_access(ch),
          spheres_buffer.get_access<access::mode::read,
          access::target::constant_buffer>(ch),
          w, h, samps};
          nd_range ndr(range(w, h), range(8, 8)); //optimal for used device
      ch.parallel_for(ndr, ray_);
    };
    q_.submit(cg);
The nd_range determines how many work groups and work items will be spawned on the device. Currently we are creating a two-dimensional range with the frames width on the “x” axis and height on the “y” axis. The local range is 8×8, which will create (width * height / 64) work groups, containing 64 work items each.
The parallel_for method takes an nd_range and in our case a “kernel functor”. Then, the command group is submitted to the queue, which will execute the kernel on the device.
The ray kernel is a functor that has two accessors, three integers and the function call operator.
class kernel_r {
public:
  vec_access c;            // frame buffer
  spheres_access spheres_; // spheres
  int w, h, samps;

  void operator()(item item_) {
    ...
      }
  }
};
vec_access and spheres_access are typedefs as follows:
typedef accessor<Vec, 1, access::mode::write, access::target::global_buffer>
    vec_access;
typedef accessor<Sphere, 1, access::mode::read, access::target::constant_buffer>
    spheres_access;
The functor’s function call operator is the SYCL kernel which in our case looks like this:
void operator()(item item_) {
    const Sphere *spheres = &spheres_[0];
    const int x = item_[0];
    const int y = item_[1];
    Vec r;
    Ray cam(Vec(50, 52, 295.6), Vec(0, -0.042612, -1).norm()); // cam pos, dir
    Vec cx = Vec(w * .5135 / h), cy = (cx % cam.d).norm() * .5135;
    RNG rng(1 + (y * w) + x); // initialize our own rng with rand() seed
    for (int sy = 0, i = (h - y - 1) * w + x; sy < 2; sy++) // 2x2 subpixel rows
      for (int sx = 0; sx < 2; sx++, r = Vec()) {           // 2x2 subpixel cols
        for (int s = 0; s < samps; s++) {
          float r1 = 2 * rng(), dx = r1 < 1 ? cl::sycl::sqrt(r1) - 1
                                            : 1 - cl::sycl::sqrt(2 - r1);
          float r2 = 2 * rng(), dy = r2 < 1 ? cl::sycl::sqrt(r2) - 1
                                            : 1 - cl::sycl::sqrt(2 - r2);
          Vec d = cx * (((sx + .5 + dx) / 2 + x) / w - .5) +
                  cy * (((sy + .5 + dy) / 2 + y) / h - .5) + cam.d;
          r = r +
              radiance(Ray(cam.o + d * 140, d.norm()), 0, spheres, rng) *
                  (1. / samps);
        } // Camera rays are pushed ^^^^^ forward to start in interior
        c[i] = c[i] + Vec(clamp(r.x), clamp(r.y), clamp(r.z)) * .25;
      }
  }
The kernel has been slightly modified from the original version. The columns’ and rows’ loops have been replaced with the respective items dimensions.
A very important change to the function signature is to pass a pointer to the spheres buffer. That change in turn required a slight modification of the intersect and radiance functions’ signatures which look like the following now:
inline bool intersect(const Ray &r, float &t, int &id,
                      const Sphere *spheres);

Vec radiance(const Ray &r_, int depth_, const Sphere *spheres,
             RNG &rng);
Since we are not using a loop, we cannot report any meaningful rendering progress. At this point we should be able to compile using our script and run the application.
| TYPE | REFERENCE | DOUBLE->FLOAT | FLOAT, REDUCED PRECISION | RNG | SYCL |
|---|---|---|---|---|---|
| Real time | 0m14.089s | 0m15.308s | 0m11.603s | 0m10.609s | 0m0.989s |
| User time | 1m48.080s | 1m58.572s | 1m29.808s | 1m21.532s | 0m0.584s |
Rendering 40 samples per pixel
…and that’s it! With 40 samples per pixel we went from 14s to 0.989s. As a bonus, let’s try 5K samples per pixel.
~/proj/sycl_smallpt$ time ./smallpt 5000
ComputeCpp> Selected Platform: AMD Accelerated Parallel Processing
ComputeCpp> Selected Device: Tonga
real 0m44.584s
user 0m0.668s

0m44.584s ( 5000 samples per pixel ) on AMD Radeon™ HD R9 295X with 4GB GDDR5. SYCL version using floats.
124 minutes to 0 minutes 44.5 seconds. Neat! There are some rendering artifacts on the ceiling. Let’s try to fix that.
Let’s try to reduce the amount of artifacts by changing the epsilon.
float t, eps = 1e-2f, b = op.dot(r.d), det = b * b - op.dot(op) + rad * rad;
becomes:
float t, eps = 1.5e-2f, b = op.dot(r.d), det = b * b - op.dot(op) + rad * rad;
~/proj/sycl_smallpt$ time ./smallpt 5000
ComputeCpp> Selected Platform: AMD Accelerated Parallel Processing
ComputeCpp> Selected Device: Tonga
real 0m44.298s
user 0m0.652s

0m44.298s ( 5000 samples per pixel ) on AMD Radeon™ HD R9 295X with 4GB GDDR5. SYCL version using floats with increased epsilon.
Overall, we lose a bit of precision here but it seems like a fair trade.
32m14.771s reference time to 0m44.298s for 5k particles, a 4000% speed-up. Neat!
4 Links
https://www.khronos.org/sycl – khronos spec.
http://www.kevinbeason.com/smallpt – raytracer
http://www.jstatsoft.org/v08/i14/paper – Xorshift RNGs
http://developer.amd.com/tools-and-sdks/opencl-zone/codexl – AMD’s CodeXL
https://github.com/codeplaysoftware/blog-ray – sycled version
