LLDB MI Driver - Part 4: How to Add a Command
08 August 2014
Articles in this series
- Part 1: Intro
- Part 2: Setting Up the Driver
- Part 3: The Design
- Part 4: How to Add a Command
1 Introduction
One of the design requirements for the Machine Interface (MI) Driver was to make it straightforward to add a new command class to the code base, while minimising interference with other code. This blog post explains how to do that; first giving some background into how and why the command system is set up as it is, then showing how to implement a command and get it operating. Following that is a description of how to get a command to parse its arguments and retrieve the values. Finally, section 4 shows examples of the different types of MI command arguments and how they are handled, and section 5 describes what to do should a command fail. If you are reading this for the first time, it is recommended to read all of the sub-sections in the order shown.
I recommend that you read Part 3 of the MI Driver blog, "The Design", as it gives a high level overview of the driver, and how an MI command is handled.
This blog assumes that you have already downloaded the MI Driver code and build files from the LLDB repository and can successfully build and run the MI Driver. The application of a command described here is based on version 1.0.0.6/7, but it is envisaged that the instructions given should cover future versions with little or few changes.
2 Command Design
Figure 1 shows a UML diagram of the command class and its association with other parts of the MI Driver.
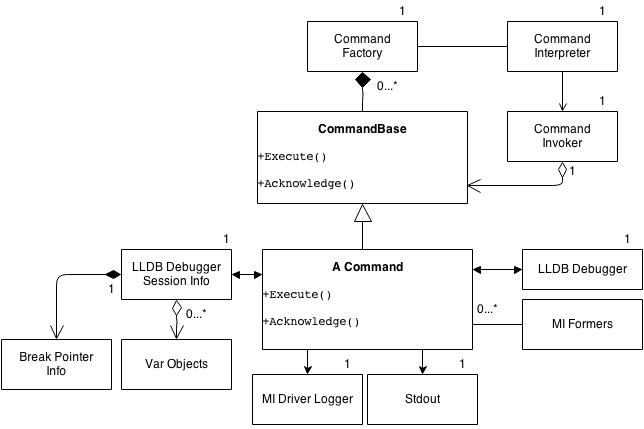
Figure 1: Command UML diagram
Your command is very likely to have to work with some parts shown in the diagram, though it does not have to. The simplest command is a class derived from CMICmdBase, overriding the Execute() and Acknowledge() functions, which does nothing in the Execute function and outputs “Done” in the Acknowledge function:
bool CMICmdCmdMyClass::Execute( void )
{
	// Do nothing
	return MIstatus::success;
}

bool CMICmdCmdMyClass::Acknowledge( void )
{
	const CMICmnMIResultRecord miRecordResult( m_cmdData.strMiCmdToken,
	                                           CMICmnMIResultRecord::eResultClass_Done );
	m_miResultRecord = miRecordResult;

	return MIstatus::success;
}
This will form the MI response:
3^Done
The components (as shown in Figure 1) that your command's code may have direct interaction with are:
- The LLDB Debugger (CMICmnLLDBDebugger)
- The debugging session information (CMICmnLLDBDebuggerSession). Holds and shares state information between commands being executed.
- The Logger (CMICmnLog). It writes status and debug information to a file.
- The MI Response formation classes. These aid the formatting of the MI response text.
- The command argument parsing classes. These aid the parsing of arguments or options that your command may require.
The other components shown in the diagram are for reference only, as your command's code will not need direct contact with those parts.
Generally, the rule for implementing a command is that work is only carried out in the Execute() function, and results of that work are turned into an MI response only in the Acknowledge() function. While this is not strictly required, other than for consistency, it does allow scope for future development, should it arise.
3 Creating a New Command Class
The steps below create and implement a simple command like the one above:
- Create a new class in an existing command interface and implementation file, or create new interface and implementation files. The files should have the same name as the command.
- In the Execute() function just return MIstatus::success. A success tells the Command Invoker that the command successfully completed its task. On receipt of a success status from the Execute() function, the Invoker calls the command's Acknowledge function. Should the Execute() function return MIstatus::failure instead, an error message is formed and reported to the MI Driver Log file via the Invoker.
- The Acknowledge() function should ideally return MIstatus::success, along with the completed MI response, as described in the previous section.
- Your command must also have, or set, the following:
- The MI command text or command name that the Command Interpreter and Factory match to the MI text from the client i.e. “trace-status”.
- A ::CreateSelf() function. The Command Factory uses this static method to create a new instance of your command class.
- The command base class variable m_pSelfCreatorFn is assigned the address of the ::CreateSelf() function.
- Register the command class with the Command Factory in the MICmdCommands.cpp file.
- Compile the MI Driver with the new code.
- From the command line run the MI Driver with the long option –interpreter.
- Type in the following to verify that your command has been implemented:
1-info-gdb-mi-command <Your MI command>
The MI Driver should respond as follows if implemented correctly:
1^done,command={exists=”true”}
1^Done - You are now ready to implement the body of your command.
4 Parsing Command Arguments
A command may parse either arguments or options as described in the MI Specification to assist in carrying out its task. In order to do this, your command class needs to override and implement the ParseArg() function. The ParseArg() function is called by the Command Invoker prior to calling the command's Execute() function. In the ParseArg() function the CMICmdArgXXX classes are used to define the arguments or options that the command will accept. The definitions are then validated against the text passed in with the MI command. If the validation and retrieving of argument values is successful, the ParseArg() function will return MIstatus::success and the Command Invoker will proceed to call the command object's Execute() function. Alternatively, if the arguments, options, or their values do not match the argument's definitions then the ParseArg() function will return MIstatus::failure, and a report is sent to the Log file describing the problem.
Argument definitions can also be set so that they output a warning (to the Log file) when they receive arguments or options that are recognized but not handled by the command (see the CMICmdArgValXXX's constructors). This allows you to track an incoming MI command that has options which you really should handle but are currently ignoring. If you have not set up a command to accept an option that it should handle, it will not be recognized during parsing, triggering a failure report to the effect that an unrecognized option was specified. Using the CMICmdArgXXX set of classes disallows a command from ignoring arguments or options.
The MI specification indicates that there are about 10 types of command arguments or options that can be handled. The CMICmdArgXXX set of classes can handle the following types of input:
- Type string and quoted text value
- Type number value
- A list of N values of a specific type
- Specific number of values
- Any number of values
- Type file path
- --longOption
- Without a value
- With a value
- Specific number of values
- Any number of values
- -s hort option
- Without a value
- With a value
- Specific number of values
- Any number of values
- There is little or no notion of the order of the arguments from left to right
- However, for some commands the order of options is important i.e. the 5th value is the thread ID, the 6th is depth. If you miss parsing the 5th value then the depth becomes the thread ID, which is wrong.
The CMICmdArgValXXX set of classes are:
| Class | Meaning |
|---|---|
| CMICmdArgValConsume | Recognize particular option and just ignore it |
| CMICmdArgValFile | Look for a string representing a file path |
| CMICmdArgValListOfN | Look for a list of values of specific type |
| CMICmdArgValNumber | Look for a numerical string |
| CMICmdArgValOptionLong | Look for a word beginning with '--' |
| CMICmdArgValOptionShort | Look for a word beginning with '-' |
| CMICmnArgValString | Look for the next word or quoted set of words |
| CMICmnArgValThreadGrp | Look for a word that indicates it is a thread group i.e. “i1” |
The CMICmdArgSet class carries out the parsing of the MI command's options that are held in a CMICmdArgContext object.
4.1 Simple Command Option Parsing
Using an existing command in the MI Driver as an example, the command info-gdb-mi-command takes one string argument, which is the name of the command. On retrieving the value of the argument, the command queries the MI Driver: “Is this command implemented?”
The code below shows the command overriding and implementing the ParseArgs() function.
bool CMICmdCmdSupportInfoMiCmdQuery::ParseArgs( void )
{
	bool bOk = m_setCmdArgs.Add( *(new CMICmdArgValString( m_constStrArgCmdName, true, true ) ) );
	if( bOk && !m_setCmdArgs.Validate( m_cmdData.strMiCmd,CMICmdArgContext( m_cmdData.strMiCmdOption ) ))
	{
		SetError( CMIUtilString::Format( MIRSRC( IDS_CMD_ERR_ARGS ), m_cmdData.strMiCmd.c_str(),
		          m_setCmdArgs.GetErrorDescription().c_str() ) );
		return MIstatus::failure;
	}

	return bOk;
}
Using the class CMICmdArgSet, an aggregate of the command, a string argument is being added to the list of arguments that this command will look for (in this case there is only one argument). The CMICmdArgValString constructor defines whether the argument is mandatory and is handled by the command. In the case that an unhandled optional argument was present, a warning would be generated.
Many of the CMICmdArgValXXX classes have different constructors that tell the object and the validation process how to parse and validate a particular argument. Once all the arguments or options are defined, the command then parses and validates the command's options text. The code below shows an example of extracting the value of an argument found in the command options text, and using it to ask whether the MI command is implemented.
bool CMICmdCmdSupportInfoMiCmdQuery::Execute( void )
{
	CMICMDBASE_GETOPTION( pArgNamedCmdName, String, m_constStrArgCmdName );
	const CMIUtilString & rCmdToQuery( pArgNamedCmdName->GetValue() );
	const MIuint nLen = rCmdToQuery.length();
	const CMICmdFactory & rCmdFactory = CMICmdFactory::Instance();
	if( (nLen > 1) && (rCmdToQuery[ 0 ] == '-') )
		m_bCmdFound = rCmdFactory.CmdExist( rCmdToQuery.substr( 1, nLen - 1 ).c_str() );
	else
		m_bCmdFound = rCmdFactory.CmdExist( rCmdToQuery );

	return MIstatus::success;
}
The first line in the function is a preprocessor macro that hides error handling code for the case where an argument name is used that is not recognized by the CMICmdValSet object. The second line shows the command retrieving the value for the argument named 'CmdName'.
The argument name is used to match the text name of the argument in the incoming MI command. In the case above, the argument name is defined in the class's constructor as “command-name”, as described in the MI specification.
If the MI command under query has been found in the Command Factory, the command's Acknowledge() function creates the MI response:
3^done,command={exists=”true”}
4.2 File Path Arguments
Using another example, the command -file-exec-and-symbols takes a file path as an argument. The code below shows the code implemented in the MI Driver to look for this type of argument. If the argument did not look like a file path, an error would be returned to the Command Invoker.
The MI command sent to the CMICmdFileExecAndSymbols command looks like:
-file-exec-and-symbols /home/user/myapplication
The MI Driver Arg class is: CMICmdArgValFile
The ParseArgs() code is:
bool bOk = m_setCmdArgs.Add( *(new CMICmdArgValFile( m_constStrArgNamePathDir, true, true ) ) );
The Execute() code is:
CMICMDBASE_GETOPTION( pArgPathDir, File, m_constStrArgNamePathDir );
const CMIUtilString & strWkDir( pArgPathDir->GetValue() );
4.3 Numerical Arguments
The MI command sent to the CMICmdThreadInfo command looks like:
-thread-info [thread-id]
As described in the MI specification, the square brackets ('[]') indicate that the argument is optional and is numerical. The second parameter in the CMICmdArgValNumber constructor is a bool, which is set to true if the argument is mandatory or false if it's optional.
The MI Driver Arg class: CMICmdArgValNumber
The ParseArgs() code:
bool bOk = m_setCmdArgs.Add( *(new CMICmdArgValNumber( m_constStrArgNameThreadId, false, true ) ) );
The Execute() code:
CMICMDBASE_GETOPTION( pArgThreadId, Number, m_constStrArgNamedThreadId );
MIuint nThreadId = 0;
m_bSingleThread = false;
if( pArgThreadId->GetFound() && pArgThreadId->GetValid() )
{
	m_bSingleThread  = true;
	nThreadId = static_cast< MIuint >( pArgThreadId->GetValue() );
}
4.4 Long Options
The MI command sent to the CMICmdExecNext command looks like:
-exec-next –threadId 1
Note that the MI specification declares that, for this command, the long option accepts only one numerical value. This will be specified in the argument definition.
The MI Driver Arg class: CMICmdArgValOptionLong
The ParseArgs() code:
bool bOk = m_setCmdArgs.Add( *(new CMICmdArgValLong( m_constStrArgNameThread, true, true,
                                                     CMICmdArgValListBase::eArgValTypeNumber, 1 ) ) );
The Execute() code:
CMICMDBASE_GETOPTION( pArgThread, OptionLong, m_constStrArgThread );
MIuint64 nThreadId = UINT64_MAX;
if( !pArgThread->GetExpectedOption< CMICmdArgValNumber, MIuint64 >( nThreadId ) )
{
	SetError( CMIUtilString::Format( MIRSRC( IDS_CMD_ERR_OPTION_NOT_FOUND ),
	                                 m_cmdData.strMiCmd.c_str(), m_constStrArgThread.c_str() ) );
	return MIstatus::failure;
}
4.5 Short Options
The MI command sent to the CMICmdVarEvaluateExpression command looks like:
-var-evaluate-expression [-f format-spec] name
Here we have an optional argument preceded by a mandatory argument. The argument definitions are searched for in the order that the definitions were added to the CMICmdArgSet object.
The MI Driver Arg class: CMICmdArgValOptionShort
The ParseArgs() code:
bool bOk = m_setCmdArgs.Add( *(new CMICmdArgValOptionShort( m_constStrArgFormatSpec, false, false,
                                                            CMICmdArgValListBase::eArgValType_String, 1 ) ) );
bOk = bOk && m_setCmdArgs.Add( *(new CMICmdArgValString( m_constStrArgName, true, true ) ) );
The Execute() code:
CMICMDBASE_GETOPTION( pArgName, String, m_constStrArgName );
CMICMDBASE_GETOPTION( pArgFormatSpec, OptionShort, m_constStrArgFormatSpec );
CMIUtilString strFormat;
if( pArgFormatSpec->GetExpectedOption< CMICmdArgValString, CMIUtilString >( strFormat ) )
{
	SetError( CMIUtilString::Format( MIRSRC( IDS_CMD_ERR_OPTION_NOT_FOUND ),
	                                 m_cmdData.strMiCmd.c_str(), m_constStrArgFormatSpec.c_str() ) );
	return MIstatus::failure;
}
const CMIUtilString & rVarObjName( pArgName->GetValue() );
The above code is an example only.
4.6 Thread Group Argument
A thread group argument has a value that looks like “i2”. The MI command sent to the CMICmdListThreadGroups command looks like:
-list-thread-groups [ --available ] [ --recurse 1 ] [ group ... ] [ i1 ]
Here we have an optional argument 'group' that takes an arbitrary list of numbers, followed by the thread group.
The ParseArgs() code:
bool bOk = m_setCmdArgs.Add( *(new CMICmdArgValOptionLong( m_constStrArgNamedAvailable, false, false )) );
bOk = bOk && m_setCmdArgs.Add( *(new CMICmdArgValOptionLong( m_constStrArgNamedRecurse, false, false,
                                                             CMICmdArgValListBase::eArgValType_Number, 1 )) );
bOk = bOk && m_setCmdArgs.Add( *(new CMICmdArgValListOfN( m_constStrArgNamedGroup, false, false,
                                                          CMICmdArgValListBase::eArgValType_Number )) );
bOk = bOk && m_setCmdArgs.Add( *(new CMICmdArgValThreadGrp( m_constStrArgNamedThreadGroup, false, true )) );
The Execute() code:
CMICMDBASE_GETOPTION( pArgThreadGroup, ThreadGrp, m_constStrArgNamedThreadGroup );
const MIint nThreadGrp = pArgThreadGroup->GetFound() ? pArgThreadGroup->GetValue() : -1;
Because the command is only handling the thread group argument, the other arguments are not retrieved in the Execute() function.
4.7 A Command That Parses Many Arguments
The MI command sent to the CMICmdBreakInsert command looks like:
-break-insert [ -t ] [ -h ] [ -f ] [ -d ] [ -a ] [ -c condition ] [ -i ignore-count ] [ -p thread-id ] [ location ]
The ParseArgs() code:
bool bOk = m_setCmdArgs.Add( *(new CMICmdArgValOptionShort( m_constStrArgNamedTempBrkPt, false, true )) );
bOk = bOk && m_setCmdArgs.Add( *(new CMICmdArgValOptionShort( m_constStrArgNamedHWBrkPt, false, false ) ) );
bOk = bOk && m_setCmdArgs.Add( *(new CMICmdArgValOptionShort( m_constStrArgNamedPendinfBrkPt, false, false ) ) );
bOk = bOk && m_setCmdArgs.Add( *(new CMICmdArgValOptionShort( m_constStrArgNamedDisableBrkPt, false, false ) ) );
bOk = bOk && m_setCmdArgs.Add( *(new CMICmdArgValOptionShort( m_constStrArgNamedTracePt, false, false ) ) );
bOk = bOk && m_setCmdArgs.Add( *(new CMICmdArgValOptionShort( m_constStrArgNamedConditionalBrkPt, false, false ) ) );
bOk = bOk && m_setCmdArgs.Add( *(new CMICmdArgValOptionShort( m_constStrArgNamedInoreCnt, false, false ) ) );
bOk = bOk && m_setCmdArgs.Add( *(new CMICmdArgValOptionShort( m_constStrArgNamedRestrictBrkPtToThreadId, false,
                                                              false ) ) );
bOk = bOk && m_setCmdArgs.Add( *(new CMICmdArgValString( m_constStrArgNamedLocation, false, true ) ) );
The Execute() code:
CMICMDBASE_GETOPTION( pArgTempBrkPt, OptionShort, m_constStrArgNamedTempBrkPt );
CMICMDBASE_GETOPTION( pArgLocation, String, m_constStrArgNamedLocation );
CMICMDBASE_GETOPTION( pArgIgnoreCnt, OptionShort, m_constStrArgNamedInoreCnt );
CMICMDBASE_GETOPTION( pArgPendingBrkPt, OptionShort, m_constStrArgNamedPendinfBrkPt );
CMICMDBASE_GETOPTION( pArgDisableBrkPt, OptionShort, m_constStrArgNamedDisableBrkPt );
CMICMDBASE_GETOPTION( pArgConditionalBrkPt, OptionShort, m_constStrArgNamedConditionalBrkPt );
CMICMDBASE_GETOPTION( pArgRestrictBrkPtToThreadId, OptionShort, m_constStrArgNamedRestrictBrkPtToThreadId );
m_bBrkPtEnabled = !pArgDisableBrkPt->GetFound();
m_bBrkPtIsTemp = pArgTempBrkPt->GetFound();
m_bBrkPtIsPending = pArgPendingBrkPt->GetFound();
m_bBrkPtCondition = pArgConditionalBrkPt->GetFound();
m_bBrkPtThreadId = pArgRestrictBrkPtToThreadId->GetFound();
if( pArgLocation->GetFound() )
	m_brkName = pArgLocation->GetValue();
The above is an example based on the real code. Because the command is only handling some of the arguments, the other arguments are not retrieved in the Execute() function. Ideally, the command should handle all of the arguments and options specified.
4.8 A Command with an Arbitrary Number of Arguments
The MI command sent to the CMICmdBreakCondition command looks like:
-break-condition number expr
This command looks simple enough, but is complicated by the fact that the 'expr' argument can be a single word, a list of words, or words surrounded by a set of quotes. For example:
A+B ? This is one word = one string
“A + B” ? This a quoted set of words = one string
A + B ? This is several words = three separate strings
We know that there must be at least one word present, otherwise the argument parsing would report an error. So, CMICmdValArgString is used and set to mandatory. The argument can be formed of a set of words surrounded by quotes, so the CMICmdValArgString is also set with 'handle quotes'. However, the expression argument can also be given to the command as a set of words not surrounded by quotes. This means that we have to handle a List of N arguments of type String as well. To deal with this, we define both a mandatory string argument and also an optional List of N strings. Though the definition list below initially seems to handle additional arguments, the final two definitions work together to handle an unquoted set of words.
The ParseArgs() code:
bool bOk = m_setCmdArgs.Add( *(new CMICmdArgValNumber( m_constStrArgNamedNumber, true, true ) ) );
bOk = bOk && m_setCmdArgs.Add( *(new CMICmdArgValString( m_constStrArgNamedExpr, true, true, true, true ) ) );
bOk = bOk && m_setCmdArgs.Add( *(new CMICmdArgValListOfN( m_constStrArgNamedExprNoQuotes, true, false,
                                                          CMICmdArgValListBase::eArgValType_StringQuotedNumber ) ) );
The Execute() code:
CMICMDBASE_GETOPTION( pArgNumber, Number, m_constStrArgNamedNumber );
CMICMDBASE_GETOPTION( pArgExpr, String, m_constStrArgNamedExpr );
m_nBrkPtId = pArgNumber->GetValue();
m_strBrkPtExpr = pArgExpr->GetValue();
m_strBrkPtExpr += GetRestOfExpressionNotSurroundedInQuotes();
As we can see above, the expression string m_strBrkPtExpr is made up of the mandatory part and any additional words added on.
All of the examples so far have shown us only how to retrieve a single value for a given argument or option. However, there are also cases where we need to retrieve a list of values for a given argument. The argument definition List of N type above is such a case. The code below shows the GetRestOfExpressionNotSurroundedInQuotes() function that is called in the code above.
CMIUtilString CMICmdCmdBreakCondition::GetRestOfExpressionNotSurroundedInQuotes( void )
{
	CMIUtilString strExpression;

	CMICmdArgValListOfN * pArgExprNoQuotes = CMICmdBase::GetOption< CMICmdArgValListOfN >(
		m_constStrArgNamedExprNoQuotes );
	if( pArgExprNoQuotes != nullptr )
	{
		CMIUtilString strExpression;
		const CMICmdArgValListBase::VecArgObjPtr_t & rVecExprParts( pArgExprNoQuotes->GetExpectedOptions() );
		if( !rVecExprParts.empty() )
		{
			CMICmdArgValListBase::VecArgObjPtr_t::const_iterator it = rVecExprParts.begin();
			while( it != rVecExprParts.end() )
			{
				const CMICmdArgValString * pPartExpr = static_cast< CMICmdArgValString * >( *it );
				const CMIUtilString & rPartExpr = pPartExpr->GetValue();
				strExpression += " ";
				strExpression += rPartExpr;

				// Next
				++it;
			}
			strExpression = strExpression.Trim();
		}
	}

	return strExpression;
}
The code above is the most explicit way to retrieve a list's values. The list type classes provide helper functions to simplify your code without the need to use the command base class function GetOption(). Some example helper functions are:
CMICmdArgValListOfN::GetExpectedOption( … ) ? Retrieve the first argument in the list
CMICmdArgValListOfN::GetExpectedOptions( … ) ? Retrieve the whole container of values
These functions are commonly used in various commands.
5 Command Error Handling
As you may have noticed from earlier examples, a command can fail by returning MIstatus::failure. This can be returned from the functions ParseArgs(), Execute() and Acknowledge(). Should a command return failure, the Command Invoker will try to retrieve an error status description message from that command and send it on to the stderr stream or Log file. It is important for all commands to set an error message upon failure.
An example of a command setting an error message is shown below.
if( bOk && !m_setCmdArgs.Validate( m_cmdData.strMiCmd, argCntxt ) )
{
	SetError( CMIUtilString::Format( MIRSRC( IDS_CMD_ERR_ARGS ), m_cmdData.strMiCmd.c_str(),
	                                 m_setCmdArgs.GetErrorDescription().c_str() ) );
	return MIstatus::failure;
}
Note that there is a distinction between a command failing due to incorrect arguments or errors in its own implementation, and a command working as expected but with its task returning a negative result. In the latter case, the command should not return a failure status.
Also note that the error descriptions are not hard-coded strings, but use the CMICmnResources Package to retrieve a string with a specified resource ID. This is because all text in the MI Driver that is seen by the end user is held in the Resources Package. In the future, should the messages require localisation, this can be handled by the Resources Package without the need to change the code in the commands.
6 Conclusion
This blog post has concluded the series on the MI Driver, covering the implementation of commands. The reader should now be able to add simple commands of their own if necessary. Thanks for reading, and we hope that you found the series useful! If you have any comments, please feel free to use the comment thread below. We'd love to hear about your experiences with the MI Driver!